
This guide for Book Groups Tasmania covers:
- How do I log in
- My Account
- Searching the catalogue
- Filtering your search results
- Sorting
- Select an Action
- Viewing title details
- Placing Holds
- My Lists
How do I log in

When you are in the Book Groups Tasmania Catalogue, you will see Log In at the top right-hand side.
Logging in gives you access to My Account, My Lists and the ability to Place Hold.
This can be done anytime from the Log In menu at the top right-hand side or when you first place a hold, access My Account or access My Lists.

When you are logged in the name of your group will display beside the menu at the top right-hand side.
My Account
Click on the My Account button at the right-hand side. You will be prompted to log in if you have not already done so.
How do I change the password/PIN? Log into My Account, go to Personal Information and you will see Change Password/PIN.
Where can I see the book group’s loans? Log into My Account and click on the Loans tab. The loans tab displays the current titles issued to your group and despatch date from Hobart. Alerts will display if title is overdue. Clicking on a title will open the title’s details.
How do I renew loans? Log into My Account, go to the Loans tab, tick the box next to the title/s you want to renew and click the Renew button.
Where can I see the book group’s holds? Log into My Account and click on the Holds tab. The holds tab displays your current holds. Holds may be cancelled by ticking the box(es) and clicking the Cancel Hold(s) button at the bottom of the list. Clicking the title will open the title’s full detail record.
Searching the catalogue
You do not need to enter a search term or phrase to commence your search. If you want to search for an exact phrase, surround the phrase with double quotation marks, for example “slow cooking” will search for results in which the words slow and cooking appear next to each other.
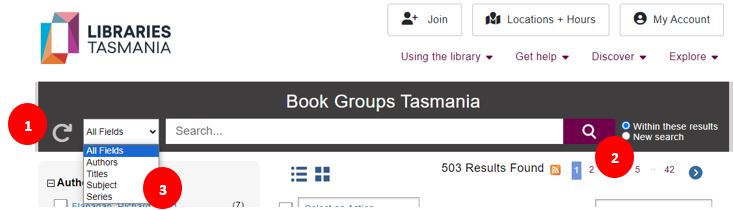
(1) At any time, you can clear your search and start your search again by clicking the reset icon. The reset icon is the arrow on the far left-hand side of the search box.
(2) Enter your search into the search box and press the enter key or click the search icon. The search icon is the magnify glass on the right-hand side of the search box.
(3) You can search on all fields or narrow your search by author, title, series or subject using the All Fields drop-down menu. The All Fields drop-down menu is placed between the reset icon and the search box.
Filtering your search results
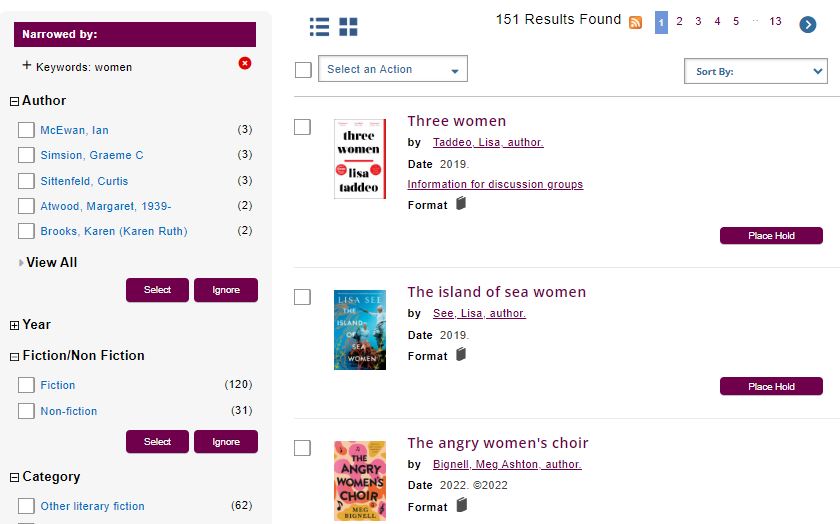
- The categories listed on the left can be used to narrow the search results. Categories can be expanded by clicking the plus sign icon and collapsed by clicking the minus sign icon.
- Click on the relevant categories box(es). Then click the Select button to filter the search by the selected categories or the Ignore button to remove the categories from the search. You can select a single limit by clicking on that particular limit’s name.
- Each category when expanded will display up to the five limits. Click on View All to display all limits available.
- To remove any limit(s) applied to filter the search click cross icon beside the limit(s) name.
Sorting
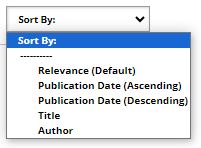
- The default sort for all results is by relevance.
- If you are using a PC or laptop and your results are less than 1000 titles, you can re-sort by Year, Title or Author using the Sort By: drop-down menu. The Sort By: drop-down menu is placed on the right-hand side below the search box and above the results found.
Select an Action

(5) To select title/s from the results found click on the relevant box(es) beside each title. You can select all titles in the list by clicking the select all box on the left at the top of the results listing.
The Select an Action drop-down menu also at the top of the results listing, allows you to perform the below actions on selected title/s:
- Add to My Lists adds the titles to your default list, see My Lists.
- Email will send the title/s in an email message. You will be prompted to enter the email address and subject for the message.
- Print displays the titles on a new page in a printable format. To then print the new page, select print in web browser that you are using.
- Place a hold(s) on the selected titles, see Placing holds.
Viewing title details
To view title Details tab, click on the image or the title in the search results. Clicking the underlined links in the search result will perform a new search for the words in that link.
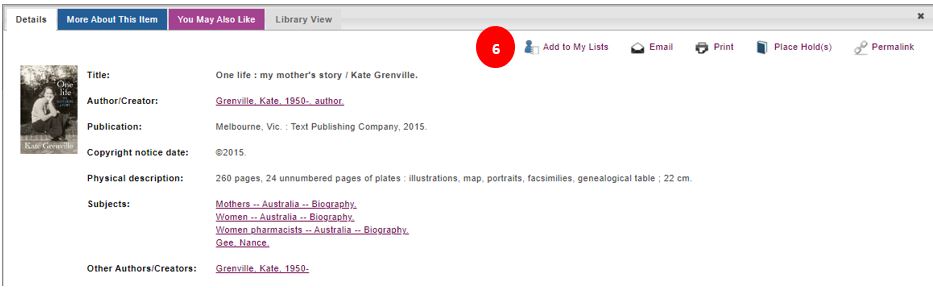
Details tab
(6) The action icons on the right-hand side allow you to perform the below actions:
- Add to My Lists adds the title to your default list, see My Lists.
- Email will send the title in an email message. You will be prompted to enter the email address and subject for the message.
- Print displays the title on a new page in a printable format. To then print the new page, select print in web browser that you are using.
- Place a hold(s) on the title, see Placing holds.
- Permalink displays the unique web address for this title which you can bookmark in your browser.

Up to three more tabs may appear to the right of the Details tab:
- More About This Item tab displays additional details about the title such as a summary, information about the author and reader reviews.
- You May Also Like tab displays suggestions for titles by the same author, for titles that have similar subject matter as well as the ability to ‘browse shelf’ and see what titles would sit nearby on a library shelf.
- Library View tab displays the full library MARC.
Placing Holds
Once your group has selected the titles you wish to read, you need to place a hold on the titles. Your group is able to have 100 holds at any time and it is recommended you continue to select titles during the year to ensure a set is available for every meeting.
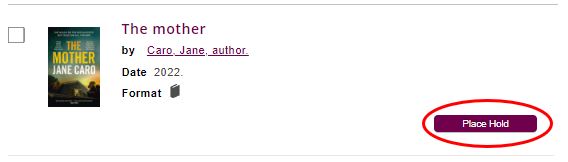
- Search the catalogue for the title you want to place a hold on. In the search results, click the Place Hold button for that title. Alternatively, view the title’s Details tab and select Place Hold(s) button from the action icons on the top right-hand side.
- Holds can be placed on multiple items by ticking the box beside the titles in the search results, then go to the Select an Action drop-down menu and select Place Hold(s).
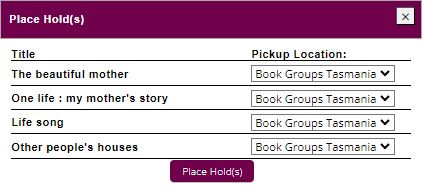
The title/s will display with Book Groups Tasmania as the Pickup Location. This pickup location can’t be changed and is not associated with the library you collect/return your sets from/to. Click the Place Hold(s) button.
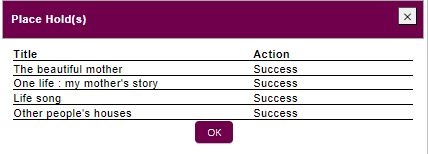
The system will display if the hold(s) were successfully placed. Click the OK button to return to your search.
My Lists
Lists allow you to keep and organise titles you may be interested in selecting in the future. There is no limit to the number of lists that you can create and no limit on the number of titles you can have in each list. You could have a list for every member to add their recommendations for the group.

Log into My Account (see Log In) and then click on the My Lists link at the top right-hand side.
Click on My Lists and a new window will open. If you are already logged in, you will see your Temporary List and saved lists. Temporary lists will be cleared when you log out or if you are not logged in and there has been no activity in the browser for 10 minutes.
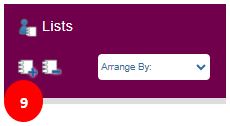
(9) How do I create a list? On the left-hand-side of the screen, click the plus sign icon. Note: you cannot rename a list once it is created. If you wish to change the name, you will need to create a new list and then move your titles from the old list to the new list.
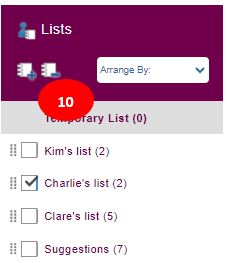
(10) How do I delete a list? On the left-hand-side of the screen, tick the box next to the list you want to delete, then click minus sign icon.
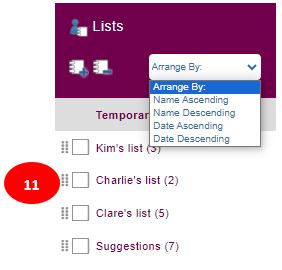
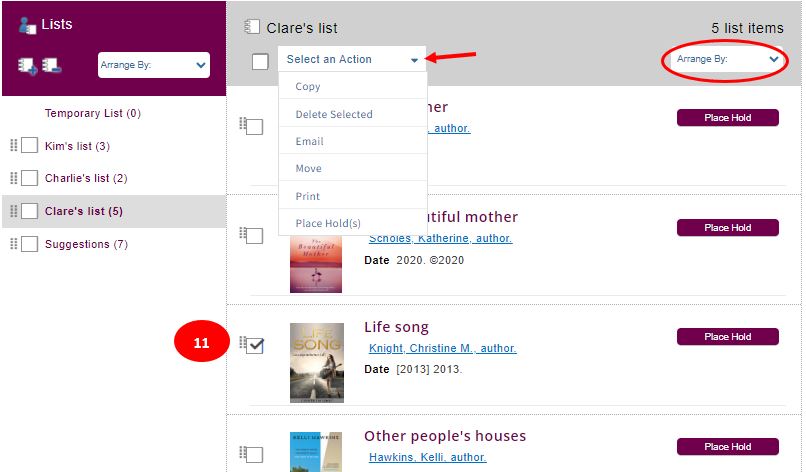
(11) The Arrange By: drop-down menu placed to the right of plus and minus icons can be used to sort lists alphabetically or by the date/time the list was created. The move icon can be used to re-arrange the order of your lists. The move icon is to the left of each list’s selection box. Click on the move icon and then drag and drop the lists into the order you want.
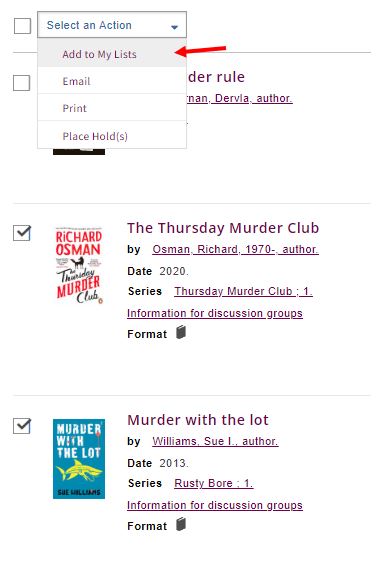
How do I add a title to My Lists? In the search results, tick the box next to the item(s), then go up to the Select an Action drop-down menu and click on Add to My Lists. If you are not logged in, this will add it to a temporary list, if you are logged in, you will be able to choose the list you want to add it to. It is recommended you login (see Log In) prior to adding titles to lists. If you have a default list set the selected titles will be added to the default list automatically.
How do I set my preferred list? Click on the My Account button at the right-hand side. You will be prompted to log in if you have not already done so. Go to Personal Information, expand Preferences and change Preferred List. The next time you go to add an item to a list from your search results, this will be the selected list.
Editing lists
To view the contents of a saved list, click on the list’s name. The titles added to the list will display on the right-hand side. Clicking on the title or image will display the title’s details.
Select the title/s to action by clicking the box next to them. Click on the select all titles box to select all titles in the list. The select all box is placed under the list’s title.
The Select an Action drop down menu placed under the list’s title can be used to:
- Copy title/s to another list. You will be prompted to select which list to copy the title/s to.
- Delete Selected remove title/s from the list. You will be prompted to confirm which title/s to remove.
- Email will send the title/s in your list in an email message. You will be prompted to enter the email address and subject for the message.
- Move will move title/s to another list. You will be prompted to select which list to move the title/s to.
- Print will display the title/s on a new page in a printable format. To then print this new page, select print in web browser that you are using.
- Place Hold(s) adds the selected title/s to your holds list. Note: this does not remove the title from the list.
- Save Temporary List will appear when viewing a Temporary List. You will be prompted to enter a name for the new list and then to save.